Top methods for DIY MacBook screen and Motherboard repairs in South Africa
Recognizing Gizmo Repair Service: Secret Considerations for Effective Screen Repair Service and Motherboard Repair
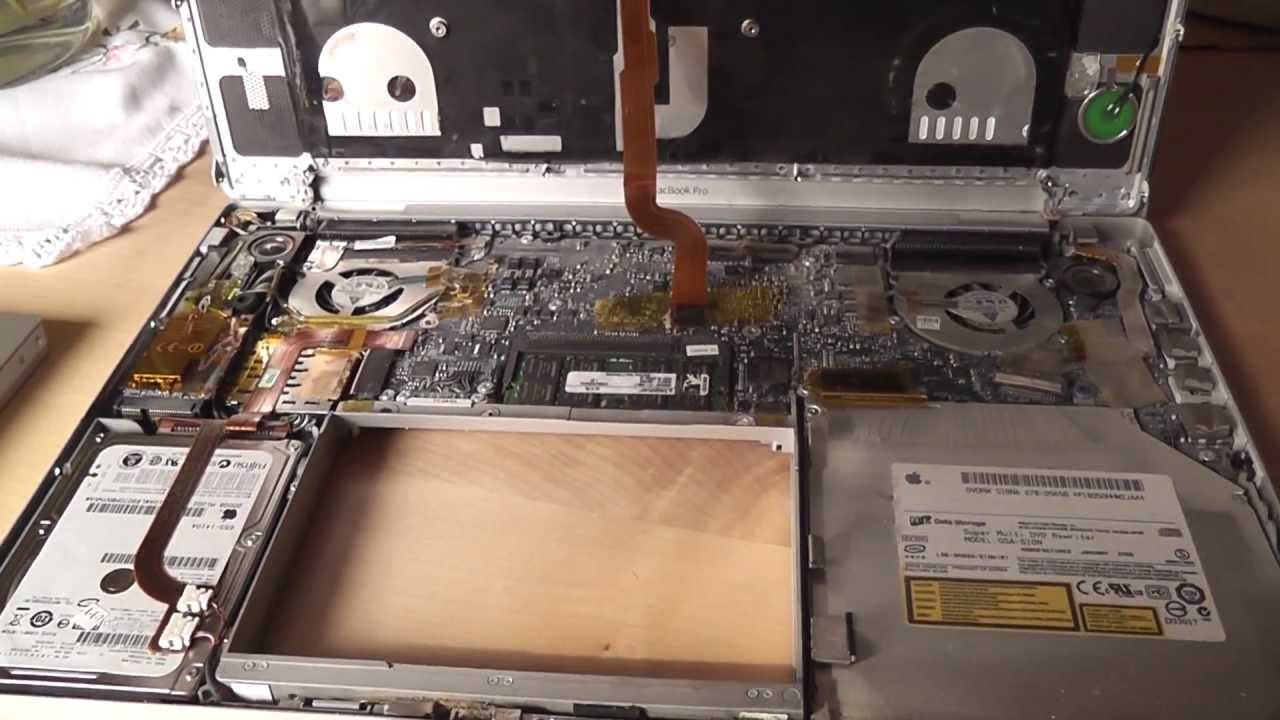
When it comes to gadget repair work, recognizing the subtleties of display and motherboard issues is essential. You'll need the right devices and an understanding of various screen types to tackle repair work effectively.
Important Tools for Screen and Motherboard Repairs
When tackling screen and motherboard fixings, having the right tools is necessary for success. You'll require a precision screwdriver collection, as these little screws need certain sizes to stay clear of stripping. A spudger or plastic pry device assists you safely open gadgets without damaging the case. Don't neglect a pair of tweezers; they'll assist in taking care of tiny components.
For screen repair services, a suction cup can lift the screen without breaking it. You must also have a warmth weapon or hairdryer available to loosen up adhesive. A multimeter is invaluable for identifying motherboard concerns, permitting you to check for shorts or defective connections.
Lastly, an anti-static wrist strap will secure delicate digital parts from static electricity. With these tools in your toolbox, you're well-appointed to manage the majority of screen and motherboard fixings effectively and properly.
Understanding Various Screen Types and Their Fixings
Numerous individuals do not realize that displays come in various types, each with its own repair considerations. On the various other hand, OLED and AMOLED displays provide lively shades and deeper blacks, but they're much more delicate, needing specialized techniques for repair services.
Some displays have added layers, like touch sensing units, which can make complex repairs. Comprehending these differences will certainly conserve you time and initiative, making certain a smoother repair service process.
Usual Motherboard Issues and Diagnostic Methods
When your gadget begins acting up, the motherboard can be the culprit. You'll desire to identify the signs of motherboard failing and understand exactly how to utilize diagnostic devices efficiently. Let's check out typical repair work strategies to get your device back in functioning order.
Indications of Motherboard Failure
Although a computer's motherboard is commonly taken for approved, acknowledging the signs of its failing can save you money and time over time. If your computer suddenly will not boot or exhibits arbitrary shutdowns, that's a red flag. You may likewise observe unusual beeping sounds during startup, which usually indicate hardware concerns. Regular accidents or ices up, specifically when running requiring applications, can signal a stopping working motherboard. Furthermore, if peripherals like USB devices aren't acknowledged or your system experiences getting too hot, these signs might direct to motherboard troubles. Regularly looking for physical damages, like scorched areas or swelling capacitors, is necessary. Being proactive regarding these indications will certainly assist you deal with prospective failures prior to they rise.
Diagnostic Tools Introduction
Recognizing prospective motherboard concerns is just the very first step; knowing just how to diagnose them efficiently can save you a great deal of disappointment. To begin, you'll want to have a multimeter useful. This device helps determine voltage and resistance, allowing you to recognize faulty components. Next, take into consideration making use of a POST (Power-On Self-Test) card. It gives you error codes that can identify particular troubles throughout boot-up. In addition, software diagnostics can give insights into equipment performance, assisting you place abnormalities. Do not ignore visual inspections either; melted elements or bulging capacitors can signify major issues. By utilizing these diagnostic devices, you can streamline your troubleshooting procedure and take on motherboard issues with confidence.
Typical Repair Techniques
Fixing common motherboard concerns needs a systematic technique to ensure you take on the problem efficiently. First, identify the signs-- less competent displays, arbitrary shutdowns, or failing to boot. Usage analysis tools like multimeters to look for brief circuits or harmed elements. As soon as you determine the issue, think about methods such as reflowing solder on cracked joints or changing blown capacitors. For software-related issues, a BIOS reset can usually fix problems. Constantly ensure that you're grounded to prevent fixed damages while working. On a regular basis document your findings to track repeated problems, which can aid in protecting against future troubles. Inevitably, a systematic strategy not only solutions the current problem but also boosts your overall repair service skills.
Step-by-Step Overview to Screen Replacement
Changing a busted screen can appear challenging, however with the right tools and a little patience, you can tackle it on your own. Insert the prying tool into the gap to very carefully separate the screen from the gadget's body.
Following, disconnect any kind of cables affixed to the screen. As soon as you have actually removed the damaged display, align the brand-new screen and link the cables safely. Press the screen right into area, making certain it fits comfortably. Reinsert the screws you formerly eliminated, and give your gadget a fast examination to verify every little thing jobs. Power it on, and appreciate your newly replaced screen!

Fixing Motherboard Troubles: Advice
When your gizmo isn't powering on or acting oddly, it could be a motherboard concern - MacBook screen and Motherboard repairs in South Africa. You'll intend to acknowledge usual signs and symptoms and gather the appropriate diagnostic tools prior to you begin troubleshooting. Let's explore the necessary steps to determine and fix those troublesome motherboard troubles
Common Signs And Symptoms Recognized
Recognizing typical signs of motherboard troubles can save you time and disappointment throughout troubleshooting. If your gadget won't power on, that's frequently a clear indicator of a motherboard concern. You might likewise see arbitrary system crashes, which can suggest malfunctioning parts. In addition, if you hear beeping sounds throughout start-up, it's your motherboard attempting to connect a mistake. Overheating can additionally be a sign, recommending that there's a problem with power delivery or air conditioning. Moreover, if peripherals aren't acknowledged or you see altered graphics, these may direct to motherboard breakdowns. By acknowledging these symptoms early, check my source you can take the needed actions to detect and repair your gadget successfully. Bear in mind, attending to these signs promptly can prevent further damages.
Analysis Tools Overview
To effectively troubleshoot motherboard troubles, having the appropriate analysis tools at hand can make all the difference. Begin with a multimeter to inspect voltage levels and continuity on numerous components. This device helps you determine power concerns or brief circuits. Next off, make use of a POST (Power-On Self-Test) card to diagnose boot issues by displaying error codes that suggest particular failures. A thermal cam can additionally be indispensable, as it aids area overheating parts that may result in motherboard failing. Lastly, having a trusted power supply tester warranties that your source of power isn't causing the issues. By making use of these tools, you'll gain valuable insights, enabling you to identify troubles much more accurately and efficiently.
Fixing Process Steps
Next, eliminate the back cover to access the motherboard. Make use of a multimeter to examine the voltage across various parts of the motherboard, guaranteeing they're operating within appropriate arrays.
If the board isn't reacting, try reseating elements like RAM and CPU to rule out connection problems. You might additionally wish to examine for dirt buildup or deterioration. Finally, if you're still encountering troubles, consider changing the damaged parts or speaking with an expert for much here more difficult fixings. Remember, persistence is type in troubleshooting!
Safety Preventative Measures Throughout Device Repair Works
While fixing gizmos can be satisfying, it's crucial to prioritize your safety and security throughout the procedure. Use proper devices to prevent slips or injuries; a dedicated toolkit can make all the distinction.
Use security glasses to secure your eyes from tiny particles, and think about handwear covers to avoid cuts or scrapes - MacBook screen and Motherboard repairs in South Africa. Beware with vulnerable elements, as they can conveniently damage. If you're taking care of batteries, validate they're not swollen or leaking, as this can pose a major danger
Acquaint on your own with the materials you're dealing with, and never rush the repair service. Taking your time my latest blog post will certainly aid you stay concentrated and secure. Following these safety measures will certainly add to a smoother and safer repair work experience.
When to Look For Expert Help for Repairs
Despite having safety precautions in place, there are times when tackling a gadget repair service may be more than you imagined. If you discover relentless problems after a DIY attempt, it's a clear indicator to seek professional aid. In addition, if your gadget reveals signs of water damage, it's important to seek advice from an expert immediately. They have the devices and experience to examine and fix damages that can get worse if left unattended.
An additional indication is when you're uncertain about the repair work process. If you find yourself bewildered by challenging elements or unfamiliar terms, do not be reluctant to reach out to a professional. Bear in mind, trying a fixing without the appropriate expertise can lead to further damage and greater expenses. If your gadget is still under warranty, looking for professional aid assurances you will not nullify it. Trusting a specialist can conserve you time, disappointment, and cash over time.
Regularly Asked Concerns
How much time Does a Typical Screen Repair Take?
A common display repair service usually takes about half an hour to an hour, depending on the tool and complexity. If you've obtained the right devices and components, you can accelerate the procedure considerably.
Can I Change a Screen Myself Without Experience?
You can change a screen on your own without experience, yet it's high-risk. You might damage your tool additionally or invalidate the warranty. If you're unsure, think about seeking professional aid for a much more trusted repair service.
What Is the Expense Range for Motherboard Services?
The cost for motherboard fixings normally ranges from $100 to $300, depending on the damages and the tool. It's important to get quotes from a number of repair stores to guarantee you're obtaining a reasonable rate.
Are Refurbished Components as Reputable as New Ones?
Refurbished components can be trustworthy, however it relies on the high quality and source. You ought to check service warranties and evaluations prior to purchasing, as some refurbished products do virtually as well as new ones, while others may not.
.webp)
Just How Can I Protect Against Future Screen Damages?
To stop future screen damages, you must buy a long lasting case, usage screen guards, stay clear of positioning your tool in perilous places, and handle it with care throughout day-to-day tasks. Remain conscious of your surroundings!